Unit Testing in Swift [with Example]
Jul 31, 2024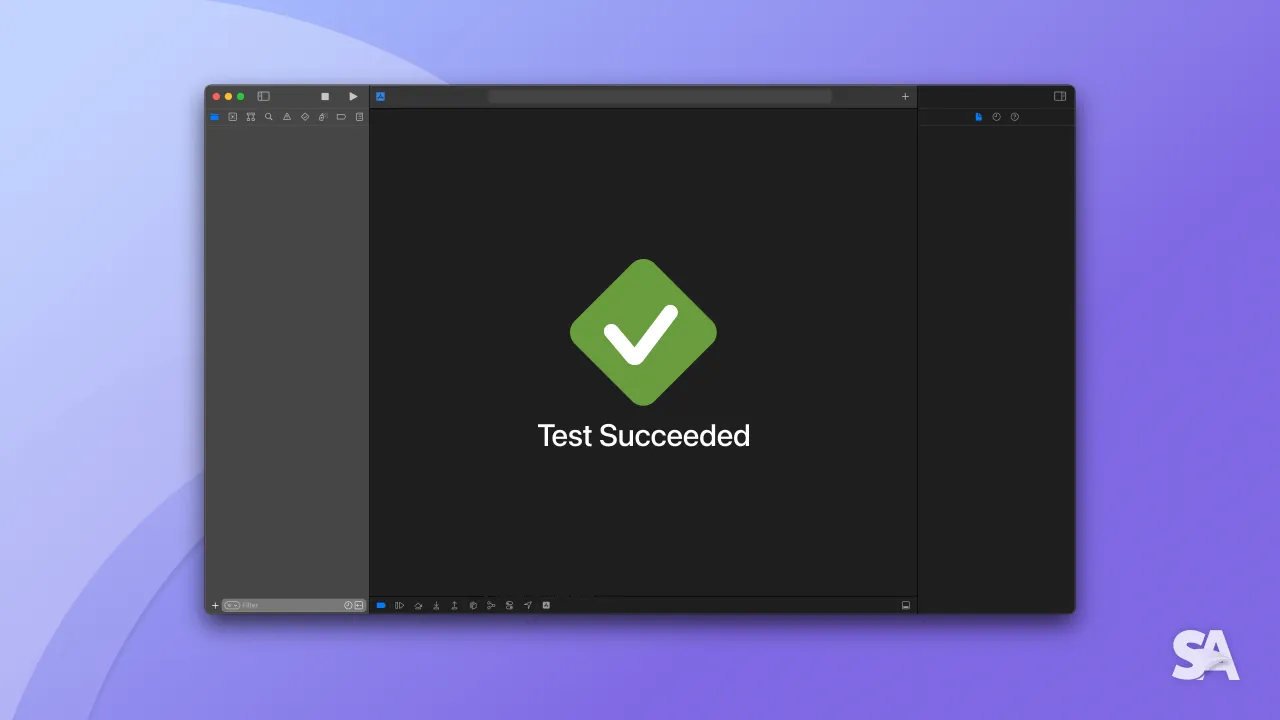
Most of the developers hesitate to write unit tests because they consider unit testing a time consuming task that makes the development cycle slower.
But the reality is, unit testing allows you to go faster in development. Suppose, your code goes into production and at some later point users encounter a bug, the time it takes to debug the issue will be much higher than the time you would have taken to write unit tests in the first place.
In this article, you are going to learn how to write unit tests in Xcode. We'll not just cover the basics but will also deep dive into the implementation with a sample SwiftUI project.
Table of Content
- What are Unit Tests in Swift
- How to setup Unit Test target in Xcode
- Unit Testing Example
- How to write Unit Tests in Swift
- How to run Unit Tests in Xcode
- Unit Tests Code Coverage
What are Unit Tests in Swift
Unit Tests are a subset of automated tests which are primarily used to test small pieces of production code independently. The primary motive behind writing unit tests is to verify that each component works as expected.
Unit Testing has several key elements:
- XCTest - It is a framework that is used to write unit tests for Xcode projects.
- XCTestCase - It is a subclass of XCTest and to ensure that Xcode considers a class as a test, it needs to be defined as a subclass of XCTestCase.
- Test Assertions - These are used to assess whether a test has passed or failed by setting expectations within the test case.
Okay! So you are good with the basics, now let's move onto setting up a Xcode project and add unit tests target to it.
How to setup Unit Test target in Xcode
Let's create a new Xcode project and while setting up the project you have to select the checkbox "Include Tests" to add unit test target.

You will now be able to see two additional folders, "ProjectNameTests" and "ProjectNameUITests" for unit testing and UI testing respectively. The "ProjectNameTests" folder is going to be the one, where you will be creating all the unit tests classes.

Note: In case you want to include tests in an existing project, you can follow the steps below:
- Go to File → New → Target
- Select "Unit Testing Bundle" and click Next
- Keep the default settings and click Finish
Unit Testing Example
Let's quickly create a basic To-Do SwiftUI app using MVVM architecture. For the sake of simplicity, the app will only have a single functionality of letting users add tasks to their todo list.
Model:
struct TodoTask: Identifiable {
    let id = UUID()
    var name: String
}
ViewModel:
class TodoViewModel: ObservableObject {
    @Published var tasks: [TodoTask] = [
        TodoTask(name: "Grocery shopping"),
        TodoTask(name: "Take pet on a walk"),
        TodoTask(name: "Work on SwiftUI app"),
    ]

    func addTask(name: String) {
        guard !name.isEmpty else { return }
        let newTodoTask = TodoTask(name: name)
        tasks.append(newTodoTask)
    }
}
View:
struct TodoView: View {
    @StateObject private var viewModel = TodoViewModel()
    @State private var newTodoTask: String = ""

    var body: some View {
        VStack {
            List(viewModel.tasks) { task in
                Text(task.name)
            }
            HStack {
                TextField("Enter a todo task", text: $newTodoTask).textFieldStyle(RoundedBorderTextFieldStyle())
                Button(action: {
                    viewModel.addTask(name: newTodoTask)
                    newTodoTask = ""
                }) {
                    Text("Add Task")
                }
            }
            .padding()
        }
    }
}
In the above code, the TodoViewModel class contains the logic required to add task to the todo list. When the user enters a todo task item and hits on the "Add Task" button, the TodoViewModel receives the action from TodoView and updates the tasks array accordingly.
Result:

Now, it's time to setup a unit test class where you will be writing the unit test cases.
How to write Unit Tests in Swift
Setup Unit test class
While performing unit testing, make sure to have separate test classes for different components of the application, and name them accordingly. Since for this example there is only a single class to test, you will have to create only one test file for TodoViewModel class within "UnitTestingDemoTests" folder.
Right click on the "UnitTestingDemoTests" folder and tap on create a New File.

Choose the template as "Unit Test Case Class" and click Next.

The convention for naming test classes is to begin it with the name of the type being tested and end with "Tests". So, you can name it "TodoViewModelTests".

As a next step, it asks you where you want to create it. Choose the "UnitTestingDemoTests" folder and make sure that it is added to the "UnitTestingDemoTests" target.

Within the file that is created, you would see a template which looks like this:

There is a "TodoViewModelTests" class defined as a subclass of XCTestCase having four functions defined inside it. Don't worry, if you're not getting any of it, simply remove the existing test functions given in the template as you'll be writing your own test functions from scratch.
Open Access to App Target Modules
Before performing unit tests, you first need to have access to the TodoViewModel class. But by default, in Swift all the classes or methods defined in the main app target have internal access control.
To enable access to the class defined in the app target, you'll have to make use of @testable import which makes the internal declarations available in the test target.
@testable import UnitTestingDemoThe next step is to define a variable of the type TodoViewModel class as an implicitly unwrapped optional so that we can declare the property without assigning it a value immediately.
private var sut: TodoViewModel!The variable by convention is named as sut which stands for "system under test". It is used to signify the class you are testing.
Setup and Teardown
Within the "TodoViewModelTests" class, you will first have to create two important override functions setUp()and tearDown() provided by XCTestCase. These functions ensure that each test run in a virtual clean room and the result or the setup of any of the previously run test shouldn't impact the current one.
The setUp() method is called before each test method in the class and is used to initialise the class in consideration.
override func setUp() {
    super.setUp()
    sut = TodoViewModel()
}
Next is the tearDown() function which is called after each test method in the class. It is used to clean up the sut by setting it to nil and also performs any teardown required in the superclass.
override func tearDown() {
    sut = nil
    super.tearDown()
}
Create test functions
Finally, its time to write the test functions which are nothing but the test cases.
How to define a test function? For a function to be a test function, it needs to follow certain basic rules. It shouldn't be declared as a private function, it's name should start with test having no parameter and return value.
What goes inside the test function? For structuring the test case, we'll follow a popular AAA approach which divides the function into 3 sections: Arrange, Act and Assert. In the Arrange section, you do the basic setup. In the Act section, you execute the method you want to test and lastly, in the Assert section you match the result with the expected value using assertions, provided by XCTest framework.
Let's define the test function for "addTask" functionality.
func test_addTask() {
    // Arrange
    let initialTaskCount = sut.tasks.count
    let newTodoTask = "Test Task"

    // Act
    sut.addTask(name: newTodoTask)

    // Assert
    XCTAssertEqual(sut.tasks.count, initialTaskCount + 1)
    XCTAssertEqual(sut.tasks.last?.name, newTodoTask)
}
In the above code:
- In Arrange section, the user action is mimicked by creating a new task "Test Task" and
initialTaskCounttracks the number of tasks in the array. - Then, call the
addTaskfunction with the dummy task. - Lastly to verify that the function works as expected, we have used "XCTAssertEqual" assertion which will pass the test case only when the actual value is equal to the expected value.
- The first assertion ensures that the tasks array count increase by 1.
- The second assertion asserts that the last element of the array is equal to the "Test Task".
"XCTAssertEqual" is just one out of many other test assertions that you can use. There are many other category of assertions which we will discuss in the next article.
How to run Unit Tests in Xcode
It's time to run the test and see the results. To run a test case, click on the diamond present in the left-hand gutter of the test function.

Congratulations! Your test case passed successfully and you will see a green diamond with a tick inside it both in front of the unit test case as well as test suite.

In case your test fails, the diamond turns red with a cross inside it.
Note: In case you have multiple test cases, you can run them all at once by clicking on the diamond present in front of the test class or by pressing Command + U.
Unit Tests Code Coverage
So far you have learnt how to write unit tests but how would you assess how much of your code is being tested.
And, that's where Code coverage comes into the picture. It is a powerful feature provided by Xcode which helps you to analyse the coverage of your tests.
If you go to the Report navigator, you will see a label named Coverage with the percentage of the code covered. If you click on it, you will see the detailed code coverage report. From here, you will get an overview of what part of your code is still pending to be tested.

You can now go to the respective file from the detailed report by simply clicking on the file name. Let's go to the TodoViewModel to analyse it.
If you hover on the addTask function, you will observe a coverage gutter on the right side. The green striped area denotes the code covered by unit tests and red area highlights the code which still needs to be tested.

The red stripe shows that you haven't written the unit test for the case when the user leaves the text field empty and clicks on the "Add Task" button. The code coverage report has given a very important insight as youe should make sure that in such a scenario, the app should neither crash nor adds the empty task item to the list.
Let's quickly write a unit test for this case within the "TodoViewModelTests" class and run it to see the result.
func test_addTask_withEmptyTask() {
    // Given
    let initialTaskCount = sut.tasks.count

    // When
    sut.addTask(name: "")

    // Then
    XCTAssertEqual(sut.tasks.count, initialTaskCount)
}
Wohoo!! All the test cases passed successfully. Now, if you again go to the TodoViewModel and hover on the addTask() function the coverage gutter displays the entire area as green and also shows a number denoting the number of times the test touched that piece of code.
Click here to download the complete project
Conclusion
Today you learnt a really important aspect of iOS development and that is Unit Testing. One key thing that you need to keep in mind is, always write multiple test cases to ensure that you have covered all the aspects of the component you're testing. It's not always required that all your test cases must pass, instead make sure you also write cases to test the failing scenarios.
If you want to build a robust application, unit testing is a must.
Where to go next?
We would highly recommend you to learn about core mobile engineering concepts like MVVM in SwiftUI with Dependency Injection and Ultimate Guide to Mobile System Design.
Signup now to get notified about our
FREE iOS Workshops!
