Complete Guide to MVVM in SwiftUI [with Example]
Jul 24, 2024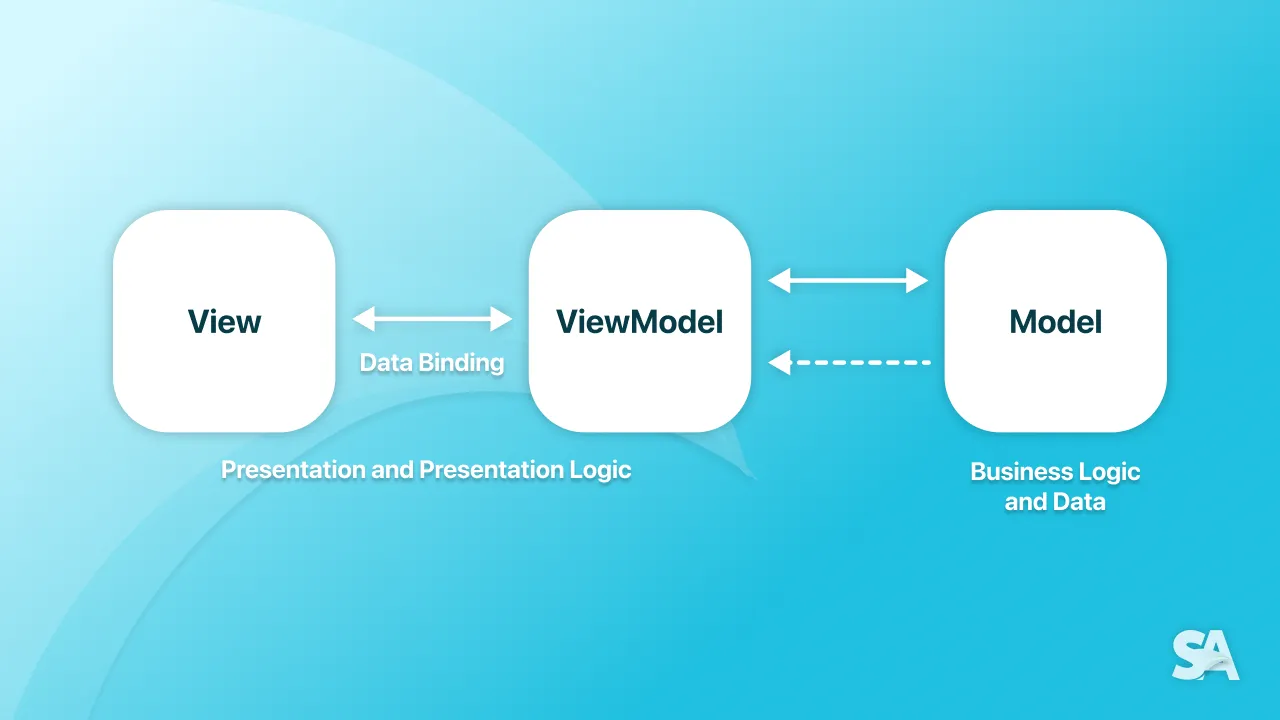
Ever felt your code becoming a tangled mess of views and logic? Building clean and maintainable apps requires a solid architectural foundation. MVVM can be your secret weapon to achieve this.
Table of Contents
1. What is MVVM?
2. Data Flow in MVVM
3. What are the benefits of MVVM?
4. MVVM in SwiftUI Example: Build To-Do Application
5. Dependency Injection with MVVM
6. Is MVVM an anti-pattern in SwiftUI?
What is MVVM?
MVVM stands for Model-View-ViewModel and it's an architecture pattern used to separate different aspects of an application. It was introduced by Microsoft architects Ken Cooper and Ted Peters in 2005 to facilitate a clear separation of concerns between UI (presentation), data (model), and the logic that bridges the two (ViewModel).
This separation allows for more maintainable and testable code. Here's a breakdown of what each part does:
-
Model: This represents your application's data and core functionality. It holds the business logic and doesn't interact directly with the user interface.
-
View: This is the user interface (UI) that users interact with. The view itself doesn't know anything about the underlying data. It displays the data prepared by the ViewModel and sends user actions to the ViewModel.
-
ViewModel: This is an intermediary between the Model and the View. It prepares the data from the Model in a way that the View can understand and use it easily. It also handles user actions received from the View and updates the Model accordingly.
Now, imagine you're building a house. You wouldn't just dump all the bricks, wood, and furniture together, right? You'd have a foundation (the data), walls and a roof (the user interface), and an architect (the viewmodel) to bring it all together. MVVM works in a similar way for applications.
Data flow in MVVM
The user interacts with the view. This interaction can be anything like clicking on a button or typing some text inside a text field or it can even be a request for a network call. The view passes this user interaction to the viewModel and the viewModel updates the model with all the necessary changes.
Once the model is updated, the model notifies the viewModel that something has changed. Since the view and the viewModel are strongly bound to each other, any changes in the viewModel will be reflected inside the view.

In SwiftUI, the ViewModel is typically a class that conforms to the ObservableObject protocol, allowing it to publish changes to the View. The View uses the @StateObject or @ObservedObject wrapper to observe the ViewModel and update the UI accordingly.
What are the benefits of MVVM?
There are several advantages to using MVVM. First, it separates the concerns of your application. Developers can focus on building the data logic (model) without worrying about the UI, and UI designers can work on the user experience (view) without needing deep knowledge of the data structures. This makes the code more maintainable and easier to test.
Imagine you want to change the look of a button in your app. With MVVM, you just modify the view, without affecting the data or the core functionalities.
MVVM also promotes cleaner code. The business logic stays isolated in the model, and the UI logic is handled by the viewmodel. This makes the code more readable and easier to understand for everyone on the development team.
So, that's the basic idea behind MVVM. Now let's see how to implement MVVM in a simple project.
MVVM in SwiftUI Example: Build To-Do Application
Let's build a To-Do List application with functionalities like displaying items, marking them complete/incomplete, and adding new items using MVVM. Here is the beginner code.
Model
struct TodoItem: Identifiable {
    let id = UUID()
    var title: String
    var isChecked: Bool
}
This TodoItem struct holds a unique identifier, the title of the task, and a boolean flag to mark it as completed.
View
struct TodoListView: View {
    @State private var items: [TodoItem] = [
        TodoItem(title: "Grocery shopping", isChecked: true),
        TodoItem(title: "Finish report for client A", isChecked: false),
        TodoItem(title: "Learn a new coding language", isChecked: true),
        TodoItem(title: " Take out the trash", isChecked: false),
    ]

    var body: some View {
        NavigationView {
            List {
                ForEach(items) { item in
                    TodoItemView(item: item) {
                        // Update items array
                        if let index = items.firstIndex(where: { $0.id == item.id }) {
                            items[index].isChecked.toggle()
                        }
                    }
                }
            }
            .navigationTitle("To-Do List")
            .toolbar {
                Button(action: {
                    // Add new item
                    items.append(TodoItem(title: "New Item", isChecked: false))
                }) {
                    Label("Add", systemImage: "plus")
                }
            }
        }
    }
}

struct TodoItemView: View {
    var item: TodoItem
    let onToggle: () -> Void

    var body: some View {
        HStack {
            Text(item.title)
                .foregroundColor(item.isChecked ? .gray : .black)
            Spacer()
            Image(systemName: item.isChecked ? "checkmark.circle" : "circle")
                .onTapGesture {
                    onToggle()
                }
        }
    }
}
Here we have an items array which is a list of TodoItem. The TodoItemView displays the title of the item and a checkbox icon based on its isChecked state. Additionally, we have a button in the toolbar for adding new items to the items array.

In this approach, the TodoListView manages the items array directly. User interactions like toggling completion or adding new items involve updating the array within the View itself. This can lead to issues such as tight coupling, hard-to-read code, and difficulty in testing. While this approach works for a simple app like this, MVVM offers a cleaner separation of concerns and improved maintainability for larger or more complex applications.
Now let's see how we can implement MVVM in this code. To implement MVVM simply means to separate concerns between data management (view model) and presentation (view).
Implementing MVVM
-
Create a ViewModel:
First, we need to create a
TodoViewModelclass to manage the data and logic.class TodoViewModel { }Now we need to move all the business logic to this
TodoViewModel.class TodoViewModel { var items: [TodoItem] = [ TodoItem(title: "Grocery shopping", isChecked: true), TodoItem(title: "Finish report for client A", isChecked: false), TodoItem(title: "Learn a new coding language", isChecked: true), TodoItem(title: " Take out the trash", isChecked: false)] func toggleItem(item: TodoItem) { if let index = items.firstIndex(where: { $0.id == item.id }) { items[index].isChecked.toggle() } } func addItem() { items.append(TodoItem(title: "New Item", isChecked: false)) } }The
TodoViewModelholds an array ofTodoItemand provides functions to add new items and toggle their completion status. -
Update TodoListView:
Now we need to update the
TodoListViewto use theTodoViewModelinstead of managing the data itself. For that, remove the@Statepropertyitemsand replace it with an instance ofTodoViewModel. While@Stateis primarily used for value types likeInt,String,Bool, etc,@StateObjectis designed for reference types (classes).@StateObject private var viewModel = TodoViewModel()When you create a
TodoViewModelinstance using@StateObjectwithin a view, SwiftUI ensures that the same instance persists throughout the lifetime of that view and its subviews.Now access the items and function from the viewModel.
struct TodoListView: View {
    @StateObject private var viewModel = TodoViewModel()

    var body: some View {
        NavigationView {
            List {
                ForEach(viewModel.items) { item in
                    TodoItemView(title: item.title) {
                        // Update items array
                        viewModel.toggleItem(item: item)
                    }
                }
            }
            .navigationTitle("To-Do List")
            .toolbar {
                Button(action: {
                    // Add new item
                    viewModel.addItem()
                }) {
                    Label("Add", systemImage: "plus")
                }
            }
        }
    }
}
Now you might get an error like this:
Generic struct 'StateObject' requires that 'TodoViewModel' conform to 'ObservableObject'
We need to make our viewModel confirm to
ObservableObject. TheObservableObjectis used to enable two-way data binding between the viewModel and the view in an MVVM architecture.class TodoViewModel: ObservableObject { ... }But you might have noticed that your view is not updating even though our
itemsarray in the viewModel is updating. This is because, earlier whenitemsis defined as a@Stateproperty, it triggers UI updates when the value changes. But now, we need to explicitly tell the UI to observe the required changes inside the viewModel. For that, we can use the@Publishedproperty wrapper.@Published var items: [TodoItem] = [ TodoItem(title: "Grocery shopping", isChecked: true), TodoItem(title: "Finish report for client A", isChecked: false), TodoItem(title: "Learn a new coding language", isChecked: true), TodoItem(title: " Take out the trash", isChecked: false), ]When a property marked with
@Published(like items in this case) is modified within the view model, theObservableObjectautomatically raises a notification. This notification is then picked up by the view, which triggers a refresh and updates the UI to reflect the changes in the data. The view doesn't need to manually track changes in the view model. It simply binds to the published properties, and the UI updates are handled automatically.Now the code works exactly the same as before using MVVM.
-
Update TodoItemView (optional):
Since the data and actions are now handled by the view model, you can further improve
TodoItemViewby removing the onToggle parameter and relying solely on the viewModel. Since we have used@StateObjectwithin the parent view, all the child views would now access the shared view model using a property wrapper called@ObservedObject.@ObservedObjectis used in child views to access and react to data managed by anObservableObjectinstance created and shared from a parent view using@StateObject. It's also useful for connecting views to any existingObservableObjectinstance that manages data relevant to the view's functionality.struct TodoItemView: View { var item: TodoItem @ObservedObject var viewModel: TodoViewModel var body: some View { HStack { Text(item.title) .foregroundColor(item.isChecked ? .gray : .black) Spacer() Image(systemName: item.isChecked ? "checkmark.circle" : "circle") .onTapGesture { viewModel.toggleItem(item: item) } } } }The
onTapGestureaction is now calling thetoggleItemmethod in the viewModel. The viewModel is passed toTodoItemViewas a parameter.TodoItemView(item: item, viewModel: viewModel)This also works the same as before.
Now imagine we need to separate the check box to a new View like this.
struct CheckBox: View {
    @ObservedObject var viewModel: TodoViewModel
    let item: TodoItem
    var body: some View {
        Image(systemName: item.isChecked ? "checkmark.circle" : "circle")
            .onTapGesture {
                viewModel.toggleItem(item: item)
            }
    }
}
So our
TodoItemViewwill look like this now.struct TodoItemView: View { @ObservedObject var viewModel: TodoViewModel let item: TodoItem var body: some View { HStack { Text(item.title) .foregroundColor(item.isChecked ? .gray : .black) Spacer() CheckBox(viewModel: viewModel, item: item) } } }Here, you can see that a viewModel is passed to
TodoItemViewas@ObservedObjecteven though the viewModel is never used in this view. It just passes it to one of its child view(CheckBox). Unlike@ObservedObject, which typically connects a child view to a shared object within its immediate parent view hierarchy, SwiftUI has another property wrapper called@EnvironmentObjectwhich allows a view to access data from anObservableObjectinstance established anywhere in the view hierarchy, even several levels above.The
ObservableObjectinstance you want to share is not directly passed down the view hierarchy. Instead, it's injected into the environment..environmentObject(viewModel)This environment is essentially a global context accessible by child views that explicitly request it.
A view can access the shared
ObservableObjectusing@EnvironmentObject.@EnvironmentObject var viewModel: TodoViewModelSimilar to
@ObservedObject, it declares a property within the view. SwiftUI then searches upwards in the view hierarchy to find a compatibleObservableObjectinstance in the environment.Here is the final code of our view.
struct TodoListView: View {
    @StateObject private var viewModel = TodoViewModel()

    var body: some View {
        NavigationView {
            List {
                ForEach(viewModel.items) { item in
                    TodoItemView(item: item)
                }
            }
            .navigationTitle("To-Do List")
            .toolbar {
                Button(action: {
                    // Add new item
                    viewModel.addItem()
                }) {
                    Label("Add", systemImage: "plus")
                }
            }
            .environmentObject(viewModel)
        }
    }
}

struct TodoItemView: View {
    let item: TodoItem
    var body: some View {
        HStack {
            Text(item.title)
                .foregroundColor(item.isChecked ? .gray : .black)
            Spacer()
            CheckBox(item: item)
        }
    }
}

struct CheckBox: View {
    @EnvironmentObject var viewModel: TodoViewModel
    let item: TodoItem
    var body: some View {
        Image(systemName: item.isChecked ? "checkmark.circle" : "circle")
            .onTapGesture {
                viewModel.toggleItem(item: item)
            }
    }
}
Notice how
.environmentObject(viewModel)is used within the NavigationView. This broadcasts theviewModelinstance down the view hierarchy, making it accessible to nested views likeCheckBox.
Click here to download the complete project
Key Points about MVVM:
- The
TodoViewModelmanages the data (items) and logic (adding and toggling items). - The
TodoListViewdefines the UI structure and binds to the view model's data. - The
TodoItemViewandCheckBoxpresent the data and interact with the view model for actions.
Dependency Injection with MVVM
Dependency injection (DI) is a way to provide a view with the objects it needs to function, instead of having the view create them itself. By injecting dependencies, you can provide mock objects during unit tests, allowing you to isolate the view's behavior.
Suppose that our To-Do app has a Details screen for each task. In that case, we may need a new viewModel that takes an item as input and performs necessary actions for that item.
Here's how you can create a details screen for each item with dependency injection:
-
Define the DetailViewModel:
class DetailViewModel: ObservableObject {
    @Published var item: TodoItem
    @Published var title: String

    init(item: TodoItem) {
        self.item = item
        title = item.title
    }

    func toggleItem(item: TodoItem) {
        self.item.isChecked.toggle()
    }

    func updateItem() {
        // Update logic for the item based on title and isChecked properties
    }
}
This
DetailViewModelmanages the details of a specificTodoItem. It takes the item as input during initialization and exposes its properties as@Publishedfor two-way data binding. -
Create the DetailView:
struct DetailView: View {
    @StateObject var viewModel: DetailViewModel

    var body: some View {
        VStack {
            HStack {
                TextField("Title", text: $viewModel.title)
                    .foregroundColor(viewModel.item.isChecked ? .gray : .black)
                Spacer()
                Image(systemName: viewModel.item.isChecked ? "checkmark.circle" : "circle")
                    .onTapGesture {
                        viewModel.toggleItem(item: viewModel.item)
                    }
            }
            Button("Save") {
                viewModel.updateItem()
            }
        }
        .padding()
        .navigationTitle("Details")
    }
}
The
DetailViewdisplays the item details and allows editing. It uses the@StateObjectproperty wrapper to bind to the DetailViewModel. Clicking "Save" triggers theupdateItemfunction in the view model, which can update the underlying data source (not shown here). -
Injecting dependency
Now let's inject the dependency (the
TodoItem) into theDetailViewby passing theTodoItemto the initializer and using it to create theDetailViewModel.extension DetailView { init(item: TodoItem) { _viewModel = StateObject(wrappedValue: DetailViewModel(item: item)) } } struct DetailView: View { @StateObject var viewModel: DetailViewModel var body: some View { VStack { HStack { TextField("Title", text: $viewModel.title) .foregroundColor(viewModel.item.isChecked ? .gray : .black) Spacer() Image(systemName: viewModel.item.isChecked ? "checkmark.circle" : "circle") .onTapGesture { viewModel.toggleItem(item: viewModel.item) } } Button("Save") { viewModel.updateItem() } } .padding() .navigationTitle("Details") } }The extension for
DetailViewdefines a new initializer that takes aTodoItemas input. This initializer is responsible for creating the dependency, which is theDetailViewModelinstance. TheDetailViewdoesn't need to know how to create theDetailViewModelitself; it just needs the functionality it provides.Now we can use the
DetailViewin theTodoListViewview.struct TodoListView: View { @StateObject private var viewModel = TodoViewModel() var body: some View { NavigationView { List { ForEach(viewModel.items) { item in NavigationLink(destination: DetailView(item: item)) { TodoItemView(item: item) } } } .navigationTitle("To-Do List") .toolbar { ... } .environmentObject(viewModel) } } }Clicking the
TodoItemViewnow navigates to theDetailView, passing the current item to theDetailViewModelduring initialization. This effectively injects the dependency.
You might have noticed that thetoggleItem()function is present in bothTodoViewModelandDetailViewModelthough its implementation is different in both cases. Here is where you may need Protocols.
By combining these parts, you'll have a simple to-do list app that demonstrates the separation of concerns in MVVM. The View simply displays the data and handles user interactions, while the ViewModel manages the underlying data and logic. This separation makes the code cleaner, more maintainable, and easier to test.
Click here to download the complete project
This is a basic example of implementing MVVM. You can further enhance it by:
- Adding error handling in the view model.
- Routing and navigation using the ViewModel.
- Separating network calls into a separate service layer.
- Adding unit tests for the view model and view in isolation.
- Implementing data persistence using UserDefaults, CoreData, or a database.
- Implementing Dependency Injection: How to decouple your ViewModel from concrete data sources.
Folder Structure
Now let's see how to have a folder structure.


This structure groups code related to a specific feature of your application into folders. Each feature folder might contain subfolders for Model, View, and ViewModel. You may have multiple Models, View, and ViewModel for each feature.
Is MVVM an anti-pattern in SwiftUI?
MVVM and SwiftUI perfectly complement each other due to their shared emphasis on state management. MVVM's focus on a single source of truth in the Model aligns with SwiftUI's declarative UI based on state. This predictability in data flow between the ViewModel and the View, along with modularity from both approaches, simplifies reasoning about UI updates and enhances testability.
However, there's a strong argument within the Apple developer community that MVVM is unnecessary for SwiftUI. Instead, apps should be built primarily with views directly interacting with the data model. For very simple apps with limited data and logic, MVVM might introduce unnecessary complexity. The separation of concerns might not be as valuable, and the boilerplate code for ViewModels might outweigh the benefits. Additionally, SwiftUI's built-in features like bindings might make the ViewModel redundant in some cases. If not implemented correctly, MVVM can lead to a more complex data flow with the potential for confusion.
Overall, MVVM is a powerful architecture for building maintainable and flexible UIs, but it's not a one-size-fits-all solution. Ultimately, the decision to use MVVM with SwiftUI depends on the specific needs of your project. Consider the complexity of your app, your team's experience, and the trade-offs between simplicity and maintainability.
Where to go next?
You have mastered the MVVM architecture in SwiftUI, learnt how to inject dependencies while initialising objects and understood why building testable and scalable codebase is important in the long run of an iOS project. Now, we would recommend you to learn more such core mobile engineering concepts, checkout Ultimate Guide to Mobile System Design.
Want to master architecture patterns in Swift? Checkout our new course on mobile system design that covers each and every aspect of low level design concepts. Learn more!
Signup now to get notified about our
FREE iOS Workshops!
