Create a SwiftUI Form
Jun 30, 2024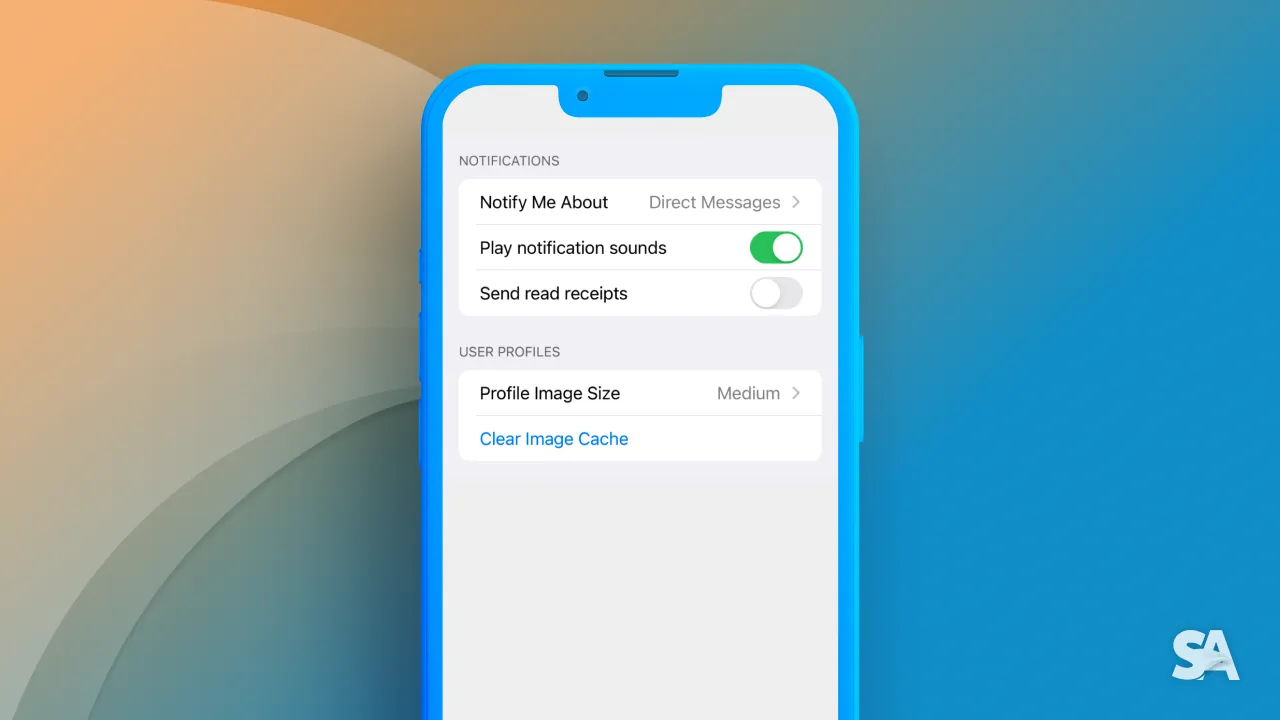
Do you know you have been using Form all the time while using your iPhone. Want to know where? Go to the settings app, the screen that you see is using a Form. It's just one of the most common use case.
Form is a SwiftUI container view which group the controls components. It is primarily used in the screens where user input or user action is required. For example, getting the user's personal information, letting the user manage their app's preferences or settings.
In this article, we will build the Setting Screen of a Chat App using SwiftUI Form. We'll cover adding the following components:
- Form with TextField
- Form with TextEditor
- Form with DatePicker
- Add Section to a Form
- Form with Toggle
- Add Picker to a Form
- Form with LabeledContent
- Form with Link
Towards the end, we will also discuss the difference between a List and a Form in SwiftUI.
How to create a Form in SwiftUI
Just like how you use other container views in SwiftUI like VStack, HStack, similar to that you can create a Form. The user-interactive controls and static components that you want to add to your app are wrapped inside the Form component.
struct ContentView: View {
  var body: some View {
    Form {
      // Your app's content goes here
    }
  }
}
Now, let's learn how multiple SwiftUI components can be added to a Form.
Form with TextField
The most basic component that you can add to the Form is a TextField. If you want to collect personal information from users, such as their name and email address, you can do so easily with a TextField in SwiftUI.
struct FormView: View {
    @State private var firstName: String = ""
    @State private var lastName: String = ""

    var body: some View {
        NavigationStack {
            Form {
                TextField("First Name", text: $firstName)
                TextField("Last Name", text: $lastName)
            }
            .navigationTitle("Settings")
        }
    }
}
Result:

In the above code, we have first created two @State variables initialised to empty strings. We then create two TextField components inside the Form which binds to their respective @State variables.
If you also want to display a title, you can wrap your Form inside a NavigationStack and pass title value in the .navigationTitle modifier.
Form with TextEditor
Similar to TextField, you can add a TextEditor to the Form for multiline scrollable text input. For example, if you want users to add a short bio about themselves, the TextEditor in SwiftUI is perfect for this purpose.
struct FormView: View {
    @State private var firstName: String = ""
    @State private var lastName: String = ""
    @State private var bio: String = "Write something about yourself..."

    var body: some View {
        NavigationStack {
            Form {
                TextField("First Name", text: $firstName)
                TextField("Last Name", text: $lastName)
                TextEditor(text: $bio)
            }
            .navigationTitle("Settings")
        }
    }
}
Result:

If you would observe, the default appearance of the text inside the TextEditor component doesn't really look like a typical input field.
To solve this, Form provides the flexibility to modify the styling of control components contained in a Form. Let's give a light gray color from UIColor.
struct FormView: View {
    @State private var firstName: String = ""
    @State private var lastName: String = ""
    @State private var bio: String = "Write something about yourself..."

    var body: some View {
        NavigationStack {
            Form {
                TextField("First Name", text: $firstName)
                TextField("Last Name", text: $lastName)
                TextEditor(text: $bio)
                    .foregroundStyle(Color(UIColor.lightGray))
            }
            .navigationTitle("Settings")
        }
    }
}
Result:

Form with DatePicker
You can allow your user select a desired calendar date with the DatePicker component within the Form. In SwiftUI, DatePicker initially appears as a text represententation of the date. When the user taps on it, a calendar views is displayed, enabling the user to select a date.
For example, if you want to collect the user's Birthdate as a part of their personal information, you can use a DatePicker in SwiftUI.
struct FormView: View {
    @State private var firstName: String = ""
    @State private var lastName: String = ""
    @State private var bio: String = "Write something about yourself..."
    @State private var date = Date()

    var body: some View {
        NavigationStack {
            Form {
                Section("Personal Information") {
                    TextField("First Name", text: $firstName)
                    TextField("Last Name", text: $lastName)
                    TextEditor(text: $bio)
                        .foregroundStyle(Color(UIColor.lightGray))
                    DatePicker(
                        "Birthdate",
                        selection: $date,
                        displayedComponents: [.date]
                    )
                }
            }
            .navigationTitle("Settings")
        }
    }
}
Result:

In the above code, we have initialised the date variable to Date(), which creates a Date object with the current date and time. Since, we only want to display the date component and not the time, we set displayedComponents to just [.date].
Add Section to a Form
Form also gives the flexibility to organise the components and divide them into sections. By providing a header to each of the sections, it not only make the Form look more structured but also help the user better navigate through the content.
Here, for the settings screen of our chat App, we will add the information related to the user into "Personal Information" section, chat related controls into "Chats" section and information like App version, Terms of Service into "About the App" section.
struct FormView: View {
    @State private var firstName: String = ""
    @State private var lastName: String = ""
    @State private var bio: String = "Write something about yourself..."
    @State private var date = Date()

    var body: some View {
        NavigationStack {
            Form {
                Section("Personal Information") {
                    TextField("First Name", text: $firstName)
                    TextField("Last Name", text: $lastName)
                    TextEditor(text: $bio)
                        .foregroundStyle(Color(UIColor.lightGray))
                    DatePicker(
                        "Birthdate",
                        selection: $date,
                        displayedComponents: [.date]
                    )
                }

                Section("Chats") {
                }

                Section("About the App") {
                }
            }
            .navigationTitle("Settings")
        }
    }
}
Result:

Now, let's continue adding more SwiftUI components to the "Chats" and "About the App" sections.
Form with Toggle
Toggle is one of the most common component that is used inside a Form. A Toggle is simply like an on and off switch to toggle between the values of a Boolean variable type.
For example, if you want to give users the option to choose whether to make their chats archived or not, in such a scenario you can use a Toggle control.
struct FormView: View {
    @State private var firstName: String = ""
    @State private var lastName: String = ""
    @State private var bio: String = "Write something about yourself..."
    @State private var date = Date()
    @State private var isChatsArchived = true

    var body: some View {
        NavigationStack {
            Form {
                Section("Personal Information") {
                    TextField("First Name", text: $firstName)
                    TextField("Last Name", text: $lastName)
                    TextEditor(text: $bio)
                        .foregroundStyle(Color(UIColor.lightGray))
                    DatePicker(
                        "Birthdate",
                        selection: $date,
                        displayedComponents: [.date]
                    )
                }

                Section("Chats") {
                    Toggle("Keep chats archived", isOn: $isChatsArchived)
                }

                Section("About the App") {
                }
            }
            .navigationTitle("Settings")
        }
    }
}
Result:

In the above code, we have first created a Boolean @State variable, initialised to true which is going to capture the toggle state, selected by the user. Then, in the Chats section, we have created the toggle component.
Add Picker to a Form
Picker as the name suggests, let you pick a value from a list of mutually exclusive values.
Say, we want to give user the control to decide the frequency of chat backup which could either be Daily, Weekly, Monthly and an option to Off the chat backup.
First, to hold the values to be passed in the picker we will create an enum.
enum ChatBackup: String, CaseIterable, Identifiable {
    case Daily, Weekly, Monthly, Off
    var id: Self { self }
}
Now, let's implement Picker in the Form.
struct FormView: View {
    @State private var firstName: String = ""
    @State private var lastName: String = ""
    @State private var bio: String = "Write something about yourself..."
    @State private var date = Date()
    @State private var isChatsArchived = true

    var body: some View {
        NavigationStack {
            Form {
                Section("Personal Information") {
                    TextField("First Name", text: $firstName)
                    TextField("Last Name", text: $lastName)
                    TextEditor(text: $bio)
                        .foregroundStyle(Color(UIColor.lightGray))
                    DatePicker(
                        "Birthdate",
                        selection: $date,
                        displayedComponents: [.date]
                    )
                }

                Section("Chats") {
                    Toggle("Keep chats archived", isOn: $isChatsArchived)
                    Picker("Chat Backup", selection: $selectedChatBackupFrequency) {
                        ForEach(ChatBackup.allCases){ frequency in
                            Text(frequency.rawValue)
                        }
                    }
                }

                Section("About the App") {
                }
            }
            .navigationTitle("Settings")
        }
    }
}
Result:

The above example creates the Picker in the default styling, however there are various ways in which we can style a Picker inside a Form. You can modify the styling using pickerStyle modifier. You can refer to the article Create and Style Picker in SwiftUI Form to learn about the different picker styles in SwiftUI.
Now, let's move onto adding components to the last section i.e. "About the App".
Form with LabeledContent
If you go to Settings → About in your iPhone, you will find multiple different details about your device like Model Name, Model Number, Serial Number etc. These static piece of information are displayed within a Form using the LabeledContent view in SwiftUI, which pairs each label with a value.
You can also add such static components to your Form. In the below example, we have created a LabeledContent for the App Version with a value of current version of the app.
struct FormView: View {
    @State private var firstName: String = ""
    @State private var lastName: String = ""
    @State private var bio: String = "Write something about yourself..."
    @State private var date = Date()
    @State private var isChatsArchived = true

    var body: some View {
        NavigationStack {
            Form {
                Section("Personal Information") {
                    TextField("First Name", text: $firstName)
                    TextField("Last Name", text: $lastName)
                    TextEditor(text: $bio)
                        .foregroundStyle(Color(UIColor.lightGray))
                    DatePicker(
                        "Birthdate",
                        selection: $date,
                        displayedComponents: [.date]
                    )
                }

                Section("Chats") {
                    Toggle("Keep chats archived", isOn: $isChatsArchived)
                    Picker("Chat Backup", selection: $selectedChatBackupFrequency) {
                        ForEach(ChatBackup.allCases){ frequency in
                            Text(frequency.rawValue)
                        }
                    }
                }

                Section("About the App") {
                    LabeledContent("App Version", value: "8.2")
                }
            }
            .navigationTitle("Settings")
        }
    }
}
Result:

Form with Link
Lastly, if you want to give the user control to Navigate to a URL, you can use a Link in your Form.
struct FormView: View {
    @State private var firstName: String = ""
    @State private var lastName: String = ""
    @State private var bio: String = "Write something about yourself..."
    @State private var date = Date()
    @State private var isChatsArchived = true

    var body: some View {
        NavigationStack {
            Form {
                Section("Personal Information") {
                    TextField("First Name", text: $firstName)
                    TextField("Last Name", text: $lastName)
                    TextEditor(text: $bio)
                        .foregroundStyle(Color(UIColor.lightGray))
                    DatePicker(
                        "Birthdate",
                        selection: $date,
                        displayedComponents: [.date]
                    )
                }

                Section("Chats") {
                    Toggle("Keep chats archived", isOn: $isChatsArchived)
                    Picker("Chat Backup", selection: $selectedChatBackupFrequency) {
                        ForEach(ChatBackup.allCases){ frequency in
                            Text(frequency.rawValue)
                        }
                    }
                }

                Section("About the App") {
                    LabeledContent("App Version", value: "8.2")
                    Link("Terms of Service", destination: URL(string: "url-of-the-link")!)
                }
            }
            .navigationTitle("Settings")
        }
    }
}
Result:

In the above code snippet, when the user clicks on "Terms of Service" they are taken outside of the app to open up the destination URL in browser.
Difference between List and Form in SwiftUI
If you replace the Form container with a List in your iOS app, you would observe no difference at all. The difference is seen when you do the comparison in UI in a macOS app.
Just like any other SwiftUI view, Form also provides a platform specific styling to views contained inside it like buttons, toggles, labels, lists, and more. Hence, the styling that List and Form provides is not necessarily the same across platforms.
Also, List is commonly used to create dynamic, scrollable lists of items, such as tables, menus, and other structured data. However, Form is typically used to show controls which involves user input or user action.
Where to go next?
Congratulations! You deserve to celebrate this moment. Today you learned about Forms in SwiftUI and how to implement multiple SwiftUI components in a Form. We encourage you to read more related articles like NavigationStack in SwiftUI and Picker Styles in SwiftUI Form.
Signup now to get notified about our
FREE iOS Workshops!
